


It has been about two weeks since I started this project. I am very happy with the results. My goals were met and I have a working product that I am quite proud of.
New Tools
GitHub
I am not new to GitHub, but I wanted to fully integrate it into my development process.
Project
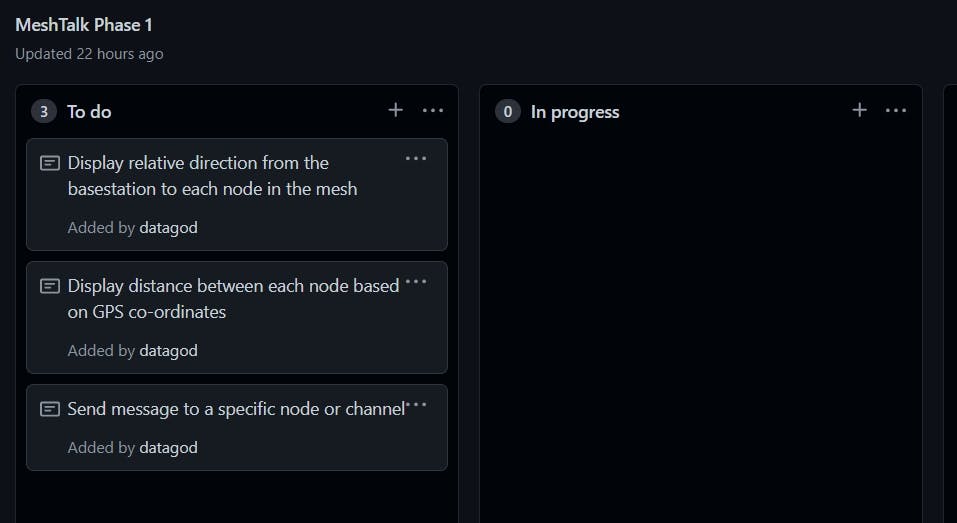
I created a project in my repository and added some tasks. I got quite a lot accomplished this way. I found it both motivational and rewarding.
Bugs / Issue
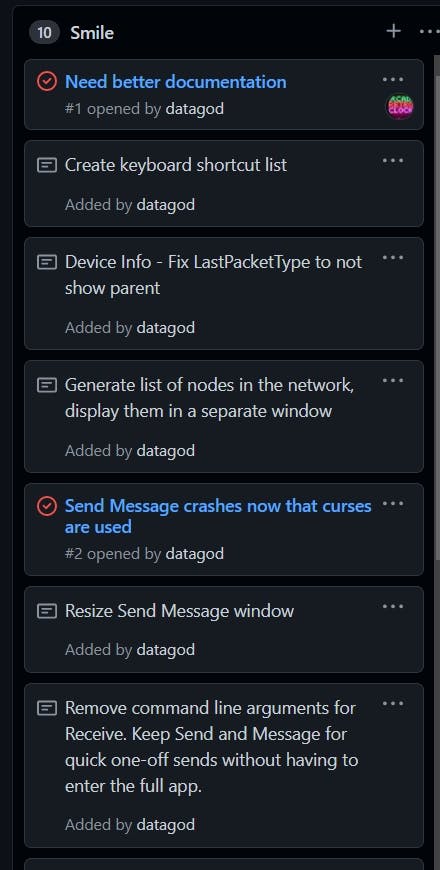
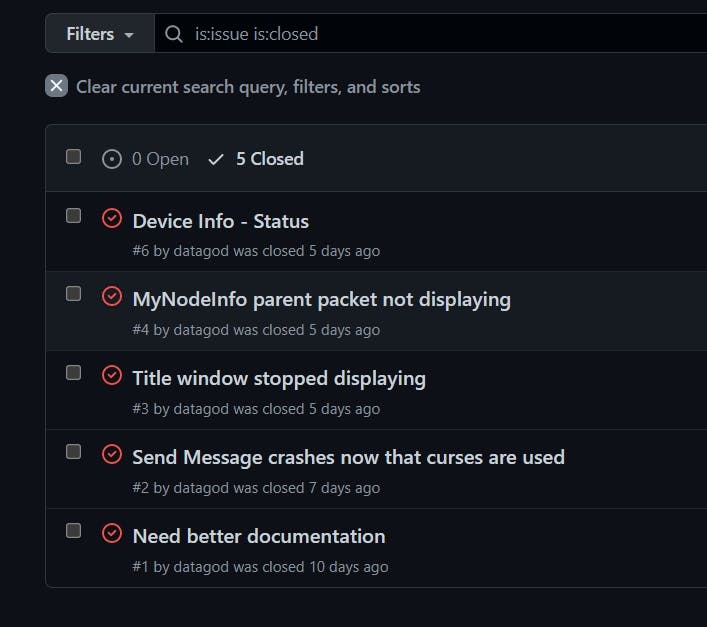
I opened and closed 5 Issues. I fixed many more along the way. Working solo, I tend to just forge ahead and not bother with documenting every little problem.
Visual Studio Code
![2021-09-26 18_54_04-meshwatch.py - pi [SSH_ meshtasticPi.local] - Visual Studio Code.jpg](https://cdn.hashnode.com/res/hashnode/image/upload/v1632696894152/hT8xX3HxB.jpeg?auto=compress,format&format=webp)
I received a good introduction to Visual Studio code including:
- getting familiar with a new editing platform
- customizing color schemes to match what I am used to
- exploring VSC marketplace for plugins
- editing files on a remote system (raspberry pi)
- pushing / pulling / committing GitHub repository directly from the editing platform
- debugging a python3 script from Windows10, running on a Raspberry Pi
I used Visual Studio 1.0 and several versions after that back in the day. The last time I gave it much attention was Visual Studio 2012, and that was for a Business Intelligence project I was working on.
When I first heard about Visual Studio Code I thought: oh great, yet another gigantic bloatware from Microsoft. I avoided it because I was quite happy with my current workflow:
- use Notepad++ to edit a python file
- FTP file to a Raspberry Pi
- use Kitty terminal program to SSH to the Pi and run the program
- have the Pi hooked up to a LCD to watch debug output
- when finished for the day check in all changes to GitHub using the GitHub desktop application
Now I can do all that within VCS, and run the debugger too. It feels pretty good to be one of the cool kids again.
![2021-09-26 19_03_56-meshwatch.py - pi [SSH_ meshtasticPi.local] - Visual Studio Code.jpg](https://cdn.hashnode.com/res/hashnode/image/upload/v1632697527353/gLHlmbD06.jpeg?auto=compress,format&format=webp)
Code Review
I want to take this time to go through the python code I wrote. There are many functions that I created that were not covered in the previous articles in this series. Now is the time to go through it all and see what interesting gems we can fin.
Included Modules / Libraries
MeshWatch relies on functions contained in other modules to operate. At the top of the program we use the import function to signify to the python interpreter that we will be using external functions.
I make use of regular ones such as time, sys, os, math. I also include specialty modules that need to be installed separately prior to running. The meshtastic module is found on GitHub
#Final Version
import meshtastic
import time
from datetime import datetime
import traceback
from meshtastic.mesh_pb2 import _HARDWAREMODEL
from meshtastic.node import Node
from pubsub import pub
import argparse
import collections
import sys
import os
import math

#to help with debugging
import inspect

#For capturing keypresses and drawing text boxes
import curses
from curses import wrapper
from curses.textpad import Textbox, rectangle

#for capturing ctl-c
from signal import signal, SIGINT
from sys import exit
Parsing Arguments
This project started out with several command line arguments, but has since been modified to only have two. This section deals with how to parse those arguments.
NAME = 'MeshWatch'
DESCRIPTION = "Send and recieve messages to a MeshTastic device"
DEBUG = False

parser = argparse.ArgumentParser(description=DESCRIPTION)
parser.add_argument('-s', '--send',    type=str,   nargs='?', help="send a text message")
parser.add_argument('-t', '--time',    type=int, nargs='?', help="seconds to listen before exiting",default = 36000)
args = parser.parse_args()

#This will now be the default behaviour
#parser.add_argument('-r', '--receive', action='store_true',   help="recieve and display messages")


#process arguments and assign values to local variables
if(args.send):
  SendMessage = True
  TheMessage = args.send
else:
  SendMessage = False
In a previous project I created called GPSProbe I did a lot of experimenting with text based windows that were run from a command line. I like to run my projects on lean builds and only ever install a full desktop environment when relying on advanced graphics.
I used a library called curses which harkens back to the good old dumb terminal days of the 1980's. This is a counter-intuitive and cumbersome set of functions, so to make life easier on myself I created a class called TextWindow. This class has several functions to allow you to quickly
- define the dimensions of a window
- draw a border
- draw a title
- write lines of text
- clear the contents
- scroll the contents
## Classes and Function
class TextWindow(object):
  def __init__(self,name, rows,columns,y1,x1,y2,x2,ShowBorder,BorderColor,TitleColor):
    self.name              = name
    self.rows              = rows
    self.columns           = columns
    self.y1                = y1
    self.x1                = x1
    self.y2                = y2
    self.x2                = x2
    self.ShowBorder        = ShowBorder
    self.BorderColor       = BorderColor #pre defined text colors 1-7
    self.TextWindow        = curses.newwin(self.rows,self.columns,self.y1,self.x1)
    self.CurrentRow        = 1
    self.StartColumn       = 1
    self.DisplayRows       = self.rows    #we will modify this later, based on if we show borders or not
    self.DisplayColumns    = self.columns #we will modify this later, based on if we show borders or not
    self.PreviousLineText  = ""
    self.PreviousLineRow   = 0
    self.PreviousLineColor = 2
    self.Title             = ""
    self.TitleColor        = TitleColor

    #If we are showing border, we only print inside the lines
    if (self.ShowBorder  == 'Y'):
      self.CurrentRow     = 1
      self.StartColumn    = 1
      self.DisplayRows    = self.rows -2 #we don't want to print over the border
      self.DisplayColumns = self.columns -2 #we don't want to print over the border
      self.TextWindow.attron(curses.color_pair(BorderColor))
      self.TextWindow.border()
      self.TextWindow.attroff(curses.color_pair(BorderColor))
      self.TextWindow.refresh()

    else:
      self.CurrentRow   = 0
      self.StartColumn  = 0
Here is one a function that lets you write one line at a time to a window. Each line will be added to the window, and if it reaches the bottom the next line will be written at the top. This is a cascading-style print. Not every likes this, but it has its uses.
def ScrollPrint(self,PrintLine,Color=2,TimeStamp=False,BoldLine=True):
    #print(PrintLine)
    #for now the string is printed in the window and the current row is incremented
    #when the counter reaches the end of the window, we will wrap around to the top
    #we don't print on the window border
    #make sure to pad the new string with spaces to overwrite any old text

    current_time = datetime.now().strftime("%H:%M:%S")

    if (TimeStamp):
      PrintLine =   current_time + ": {}".format(PrintLine)

    #expand tabs to X spaces, pad the string with space
    PrintLine = PrintLine.expandtabs(4)

    #adjust strings
    #Get a part of the big string that will fit in the window
    PrintableString = ''
    RemainingString = ''
    PrintableString = PrintLine[0:self.DisplayColumns]
    RemainingString = PrintLine[self.DisplayColumns+1:]

    #Pad1.PadPrint("PrintLine:{}".format(PrintLine),2,TimeStamp=True)
    #Pad1.PadPrint("Printable:{}".format(PrintableString),2,TimeStamp=True)
    #Pad1.PadPrint("Remaining:{}".format(RemainingString),2,TimeStamp=True)


    try:

      while (len(PrintableString) > 0):

        #padd with spaces
        PrintableString = PrintableString.ljust(self.DisplayColumns,' ')

        #if (self.rows == 1):
        #  #if you print on the last character of a window you get an error
        #  PrintableString = PrintableString[0:-2]
        #  self.TextWindow.addstr(0,0,PrintableString)
        #else:


        #unbold Previous line
        self.TextWindow.attron(curses.color_pair(self.PreviousLineColor))
        self.TextWindow.addstr(self.PreviousLineRow,self.StartColumn,self.PreviousLineText)
        self.TextWindow.attroff(curses.color_pair(self.PreviousLineColor))


        if (BoldLine == True):
          #A_NORMAL        Normal display (no highlight)
          #A_STANDOUT      Best highlighting mode of the terminal
          #A_UNDERLINE     Underlining
          #A_REVERSE       Reverse video
          #A_BLINK         Blinking
          #A_DIM           Half bright
          #A_BOLD          Extra bright or bold
          #A_PROTECT       Protected mode
          #A_INVIS         Invisible or blank mode
          #A_ALTCHARSET    Alternate character set
          #A_CHARTEXT      Bit-mask to extract a character
          #COLOR_PAIR(n)   Color-pair number n

          #print new line in bold
          self.TextWindow.attron(curses.color_pair(Color))
          self.TextWindow.addstr(self.CurrentRow,self.StartColumn,PrintableString,curses.A_BOLD)
          self.TextWindow.attroff(curses.color_pair(Color))
        else:
          #print new line in Regular
          self.TextWindow.attron(curses.color_pair(Color))
          self.TextWindow.addstr(self.CurrentRow,self.StartColumn,PrintableString)
          self.TextWindow.attroff(curses.color_pair(Color))

        self.PreviousLineText  = PrintableString
        self.PreviousLineColor = Color
        self.PreviousLineRow   = self.CurrentRow
        self.CurrentRow        = self.CurrentRow + 1


        #Adjust strings
        PrintableString = RemainingString[0:self.DisplayColumns]
        RemainingString = RemainingString[self.DisplayColumns:]


      if (self.CurrentRow > (self.DisplayRows)):
        if (self.ShowBorder == 'Y'):
          self.CurrentRow = 1
        else:
          self.CurrentRow = 0


      #erase to end of line
      #self.TextWindow.clrtoeol()
      self.TextWindow.refresh()

    except Exception as ErrorMessage:
      TraceMessage = traceback.format_exc()
      AdditionalInfo = "PrintLine: {}".format(PrintLine)

      ErrorHandler(ErrorMessage,TraceMessage,AdditionalInfo)
This function shows how you clear a window. You use erase() to remove the contents, then you turn on the color, draw the border, turn off the color, display the title.
A subsequent refresh() will redraw the screen, showing all the changes recently made.
  def Clear(self):
    self.TextWindow.erase()
    self.TextWindow.attron(curses.color_pair(self.BorderColor))
    self.TextWindow.border()
    self.TextWindow.attroff(curses.color_pair(self.BorderColor))
    self.DisplayTitle()

    #self.TextWindow.refresh()
    if (self.ShowBorder  == 'Y'):
      self.CurrentRow    = 1
      self.StartColumn   = 1
    else:
      self.CurrentRow   = 0
      self.StartColumn  = 0
Another class I created is called TextPad. This acts as a virtual notepad. The pad can be any size you want, and a window will display a portion of the pad on your screen. You can even enable the pad for editing in order to accept and display input from the user.
class TextPad(object):
  #use this as a virtual notepad
  #write a large amount of data to it, then display a section of it on the screen
  #to have a border, use another window with a border
  def __init__(self,name, rows,columns,y1,x1,y2,x2,ShowBorder,BorderColor):
    self.name              = name
    self.rows              = rows
    self.columns           = columns
    self.y1                = y1 #These are coordinates for the window corners on the screen
    self.x1                = x1 #These are coordinates for the window corners on the screen
    self.y2                = y2 #These are coordinates for the window corners on the screen
    self.x2                = x2 #These are coordinates for the window corners on the screen
    self.ShowBorder        = ShowBorder
    self.BorderColor       = BorderColor #pre defined text colors 1-7
    self.TextPad           = curses.newpad(self.rows,self.columns)
    self.PreviousLineColor = 2

  def PadPrint(self,PrintLine,Color=2,TimeStamp=False):
    #print to the pad
    try:
      self.TextPad.idlok(1)
      self.TextPad.scrollok(1)

      current_time = datetime.now().strftime("%H:%M:%S")
      if (TimeStamp):
        PrintLine = current_time + ": " + PrintLine

      #expand tabs to X spaces, pad the string with space then truncate
      PrintLine = PrintLine.expandtabs(4)
      PrintLine = PrintLine.ljust(self.columns,' ')

      self.TextPad.attron(curses.color_pair(Color))
      self.TextPad.addstr(PrintLine)
      self.TextPad.attroff(curses.color_pair(Color))

      #We will refresh afer a series of calls instead of every update
      self.TextPad.refresh(0,0,self.y1,self.x1,self.y1 + self.rows,self.x1 + self.columns)

    except Exception as ErrorMessage:
      time.sleep(2)
      TraceMessage = traceback.format_exc()
      AdditionalInfo = "PrintLine: " + PrintLine
      ErrorHandler(ErrorMessage,TraceMessage,AdditionalInfo)


  def Clear(self):
    try:
      self.TextPad.erase()
      #self.TextPad.noutrefresh(0,0,self.y1,self.x1,self.y1 + self.rows,self.x1 + self.columns)
      self.TextPad.refresh(0,0,self.y1,self.x1,self.y1 + self.rows,self.x1 + self.columns)
    except Exception as ErrorMessage:
      TraceMessage = traceback.format_exc()
      AdditionalInfo = "erasing textpad"
      ErrorHandler(ErrorMessage,TraceMessage,AdditionalInfo)
Error Handling
I have used error handling in my programs since 1993. I joined a large project with a world wide consulting firm (one of the big ones) and they introduced us all to error capturing and handling. I have extensive error handlers written for SQL Server, and I have a somewhat scaled down version that I use in Python.
This function takes several arguments (generated at the time of the error) and does whatever is necessary to get the screen back into a useful state before displaying the error output. This is accomplished by calling FinalCleanup().
def ErrorHandler(ErrorMessage,TraceMessage,AdditionalInfo):
  CallingFunction =  inspect.stack()[1][3]
  FinalCleanup(stdscr)
  print("")
  print("")
  print("--------------------------------------------------------------")
  print("ERROR - Function (",CallingFunction, ") has encountered an error. ")
  print(ErrorMessage)
  print("")
  print("")
  print("TRACE")
  print(TraceMessage)
  print("")
  print("")
  if (AdditionalInfo != ""):
    print("Additonal info:",AdditionalInfo)
    print("")
    print("")
  print("--------------------------------------------------------------")
  print("")
  print("")
  time.sleep(1)
  sys.exit('Good by for now...')


def FinalCleanup(stdscr):
  stdscr.keypad(0)
  curses.echo()
  curses.nocbreak()
  curses.curs_set(1)
  curses.endwin()
An example of calling the error handler:
  def PadPrint(self,PrintLine,Color=2,TimeStamp=False):
    #print to the pad

    try:

      self.TextPad.idlok(1)
      self.TextPad.scrollok(1)

      current_time = datetime.now().strftime("%H:%M:%S")
      if (TimeStamp):
        PrintLine = current_time + ": " + PrintLine

      #expand tabs to X spaces, pad the string with space then truncate
      PrintLine = PrintLine.expandtabs(4)
      PrintLine = PrintLine.ljust(self.columns,' ')

      self.TextPad.attron(curses.color_pair(Color))
      self.TextPad.addstr(PrintLine)
      self.TextPad.attroff(curses.color_pair(Color))

      #We will refresh after a series of calls instead of every update
      self.TextPad.refresh(0,0,self.y1,self.x1,self.y1 + self.rows,self.x1 + self.columns)

    except Exception as ErrorMessage:
      time.sleep(2)
      TraceMessage = traceback.format_exc()
      AdditionalInfo = "PrintLine: " + PrintLine
      ErrorHandler(ErrorMessage,TraceMessage,AdditionalInfo)
If any error occurrs between the TRY and the EXCEPT the code will be executed to gather information and that will be passed to ErrorHandler().
Making Windows
Like many of my projects, there are no specifications. Just me with a general idea of something fun I want to work on. I know I wanted a windows display, I just was not sure how many windows or what shape they would require.
#NOTE: When making changes, be very careful.  Each Window's position is relative to the other ones on the same
  #horizontal level.  Change one setting at a time and see how it looks on your screen

  #Window1 Coordinates (info window)
  Window1Height = 12
  Window1Length = 40
  Window1x1 = 0
  Window1y1 = 1
  Window1x2 = Window1x1 + Window1Length
  Window1y2 = Window1y1 + Window1Height


  #Window2 Coordinates (small debug window)
  Window2Height = 12
  Window2Length = 40
  Window2x1 = Window1x2 + 1
  Window2y1 = 1
  Window2x2 = Window2x1 + Window2Length
  Window2y2 = Window2y1 + Window2Height

  #Window3 Coordinates (Messages)
  Window3Height = 12
  Window3Length = 104
  Window3x1 = Window2x2 + 1
  Window3y1 = 1
  Window3x2 = Window3x1 + Window3Length
  Window3y2 = Window3y1 + Window3Height
To allegedly make things simpler for myself, I base the co-ordinates of each window on the Y,X (curses is backwards!) co-ordinates of the previous window.
This way I can change the horizontal size of a window and not have to figure out the YX of the other windows. As longs as I don't go out of bounds, the windows will be drawn with the new size.
As you can see it gets rather convoluted, especially after the 6th window is added.
#SendMessage Window
  #This window will be used to display the border
  #and title and will surround the input window
  SendMessageWindowHeight = 6
  SendMessageWindowLength = 44
  SendMessageWindowx1 = Window5x2 + 1
  SendMessageWindowy1 = HelpWindowy1 + HelpWindowHeight
  SendMessageWindowx2 = SendMessageWindowx1 + SendMessageWindowLength
  SendMessageWindowy2 = SendMessageWindowy1 + SendMessageWindowHeight

  #InputMessage Window
  #This window will be used get the text to be sent
  InputMessageWindowHeight = SendMessageWindowHeight -2
  InputMessageWindowLength = SendMessageWindowLength -2
  InputMessageWindowx1 = Window5x2 + 2
  InputMessageWindowy1 = HelpWindowy1 + HelpWindowHeight +1
  InputMessageWindowx2 = InputMessageWindowx1 + InputMessageWindowLength -2
  InputMessageWindowy2 = InputMessageWindowy1 + InputMessageWindowHeight -2
Drawing the windows
Now that we have all the classes configured and the sizes pre-calculated, we can go ahead and create the windows themselves.
    #--------------------------------------
    # Draw Screen                        --
    #--------------------------------------

    # Create windows
                              # name,  rows,      columns,   y1,    x1,    y2,    x2,ShowBorder,BorderColor,TitleColor):
    TitleWindow   = TextWindow('TitleWindow',1,50,0,0,0,50,'N',0,0)
    StatusWindow  = TextWindow('StatusWindow',1,50,0,51,0,100,'N',0,0)
    StatusWindow2 = TextWindow('StatusWindow2',1,30,0,101,0,130,'N',0,0)
    Window1       = TextWindow('Window1',Window1Height,Window1Length,Window1y1,Window1x1,Window1y2,Window1x2,'Y',2,2)
    Window2       = TextWindow('Window2',Window2Height,Window2Length,Window2y1,Window2x1,Window2y2,Window2x2,'Y',2,2)
    Window3       = TextWindow('Window3',Window3Height,Window3Length,Window3y1,Window3x1,Window3y2,Window3x2,'Y',3,3)
    Window4       = TextWindow('Window4',Window4Height,Window4Length,Window4y1,Window4x1,Window4y2,Window4x2,'Y',5,5)
    Window5       = TextWindow('Window5',Window5Height,Window5Length,Window5y1,Window5x1,Window5y2,Window5x2,'Y',6,6)
    HelpWindow    = TextWindow('HelpWindow',HelpWindowHeight,HelpWindowLength,HelpWindowy1,HelpWindowx1,HelpWindowy2,HelpWindowx2,'Y',7,7)
    SendMessageWindow  = TextWindow('SendMessageWindow',SendMessageWindowHeight,SendMessageWindowLength,SendMessageWindowy1,SendMessageWindowx1,SendMessageWindowy2,SendMessageWindowx2,'Y',7,7)
    InputMessageWindow = TextWindow('InputMessageWindow',InputMessageWindowHeight,InputMessageWindowLength,InputMessageWindowy1,InputMessageWindowx1,InputMessageWindowy2,InputMessageWindowx2,'N',7,7)
    Pad1               = TextPad('Pad1', Pad1Lines,Pad1Columns,Pad1y1,Pad1x1,Pad1y2,Pad1x2,'N',5)
Decoding Packets
Meshtastic devices communicate with eather other by sending data packets. When python intercepts these packets they are in the form of a dictionary (a key value pair).
Each value in the key value pair could itself be another packet/dictionary. This made my decoding rather frustrating at first because my code kept crashing. I didn't know the structure so I build a recursive function that will take a packet and parse it. It if finds another packet, it will parse that as well.
def DecodePacket(PacketParent,Packet,Filler,FillerChar,PrintSleep=0):
  global DeviceStatus
  global DeviceName
  global DevicePort
  global PacketsReceived
  global PacketsSent
  global LastPacketType
  global HardwareModel
  global DeviceID
  global BatteryLevl


  #This is a recursive funtion that will decode a packet (get key/value pairs from a dictionary )
  #if the value is itself a dictionary, recurse
  Window2.ScrollPrint("DecodePacket",2,TimeStamp=True)
  #Filler = ('-' *  len(inspect.stack(0)))

  #used to indent packets
  if (PacketParent.upper() != 'MAINPACKET'):
    Filler = Filler + FillerChar

  Window4.ScrollPrint("{}".format(PacketParent).upper(),2)


  #adjust the input to slow down the output for that cool retro feel
  if (PrintSleep > 0):
    time.sleep(PrintSleep)


  #if the packet is a dictionary, decode it
  if isinstance(Packet, collections.abc.Mapping):


    for Key in Packet.keys():
      Value = Packet.get(Key)

      if (PrintSleep > 0):
        time.sleep(PrintSleep)


      #Pad1.PadPrint("{} - {}".format(PacketParent,Key),2)

      #if the value paired with this key is another dictionary, keep digging
      if isinstance(Value, collections.abc.Mapping):

        #Print the name/type of the packet
        Window4.ScrollPrint(" ",2)
        #Window4.ScrollPrint("{}".format(Key).upper(),2)
        LastPacketType = Key.upper()

        DecodePacket("{}/{}".format(PacketParent,Key).upper(),Value,Filler,FillerChar,PrintSleep=PrintSleep)


      else:

        if(Key == 'longName'):
          DeviceName = Value
          UpdateStatusWindow(NewDeviceName=DeviceName,Color=2)

        elif(Key == 'portnum'):
          DevicePort = Value
          UpdateStatusWindow(NewDevicePort=DevicePort,Color=2)

        elif(Key == 'hwModel'):
          HardwareModel = Value
          UpdateStatusWindow(NewHardwareModel=HardwareModel,Color=2)

        elif(Key == 'macaddr'):
          MacAddress = Value
          UpdateStatusWindow(NewMacAddress=MacAddress,Color=2)

        elif(Key == 'id' and PacketParent == 'MYNODE/USER'):
          DeviceID = Value
          UpdateStatusWindow(NewDeviceID=DeviceID,Color=2)

        elif(Key == 'batteryLevel'):
          BatteryLevel = Value
          UpdateStatusWindow(NewBatteryLevel=BatteryLevel,Color=2)

        #Print KEY if not RAW (gotta decode those further, or ignore)
        if(Key == 'raw'):
          Window4.ScrollPrint("{}  RAW value not yet suported by DecodePacket function".format(Filler),2)
        else:
          Window4.ScrollPrint("  {}{}: {}".format(Filler,Key,Value),2)


  else:
    Window2.ScrollPrint("Warning: Not a packet!",5,TimeStamp=True)

  #Window4.ScrollPrint("{}END PACKET: {} ".format(Filler,PacketParent.upper()),2)
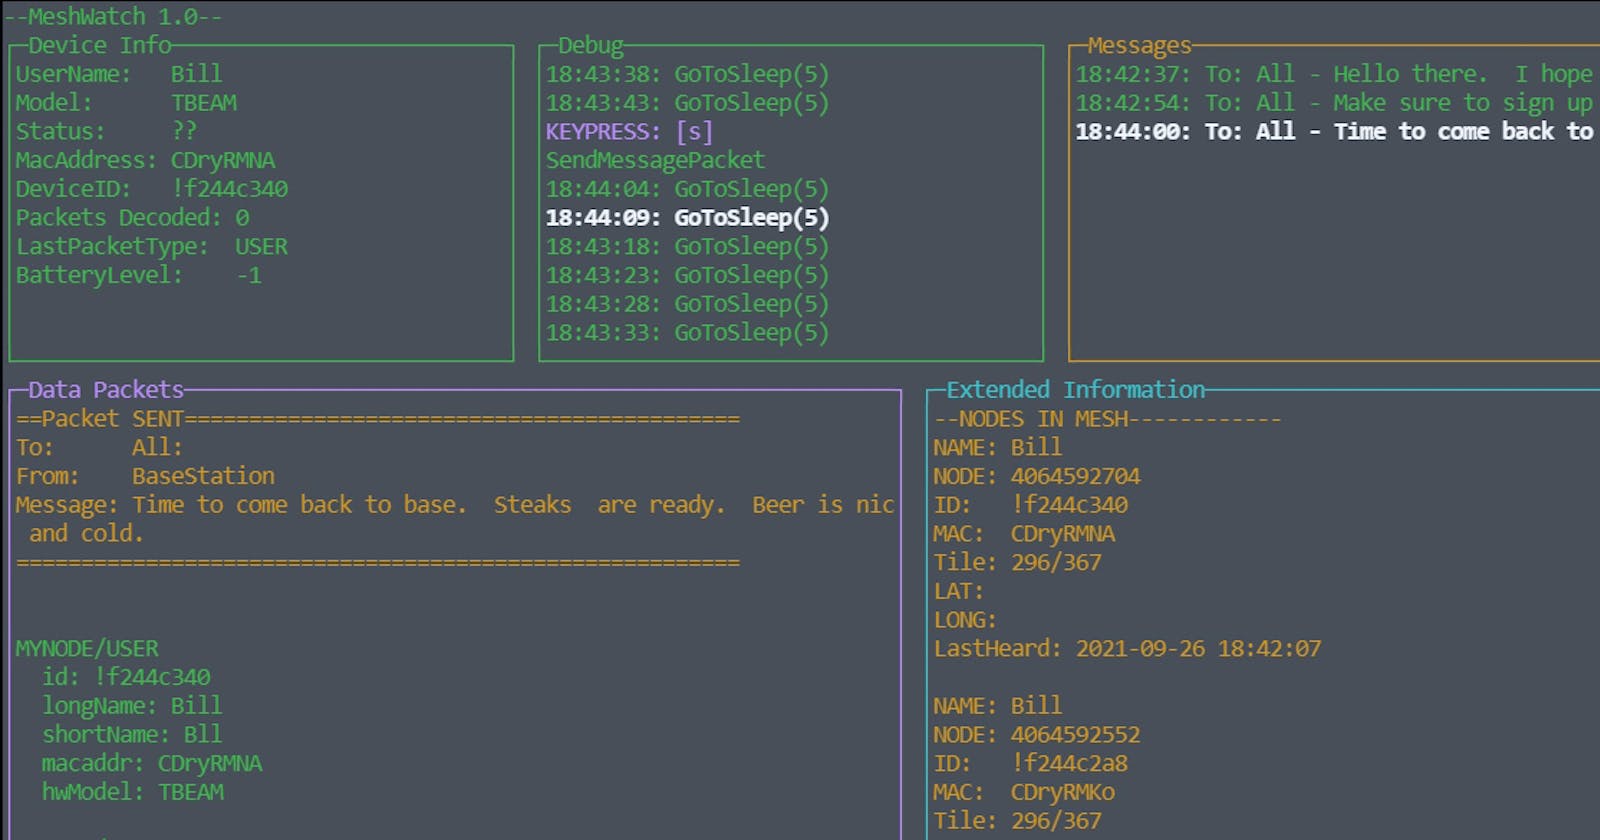
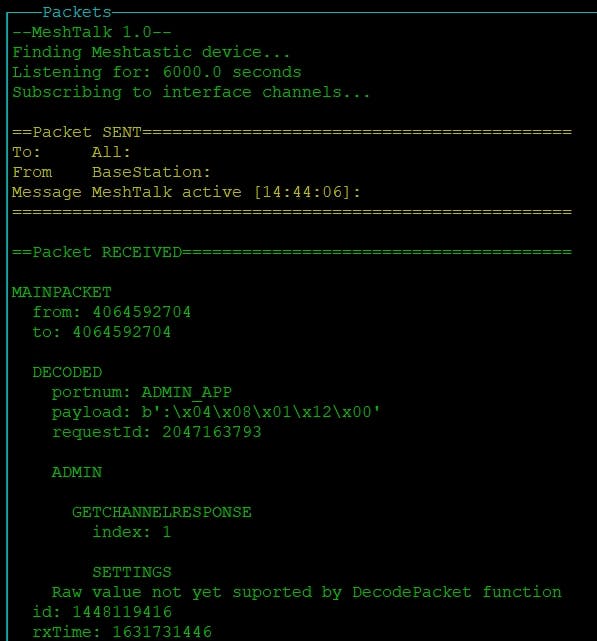
In the code above you can see DecodePacket() will check each value and if it finds the value is another packet/dictionary, it will call DecodePacket with that packet to be parsed.
In this image you can see the output is staggered. Each indentation is from an embedded packet being decoded. It turned out better than I thought. In the end I went with a different format though, as the indentations were getting a bit ugly.
Receiving Packets
This function is taken from an example in the Meshtastic documentation. I have tweaked it a bit, adding some handy displaylines.
def onReceive(packet, interface): # called when a packet arrives
    global PacketsReceived
    global PacketsSent

    PacketsReceived = PacketsReceived + 1


    Window2.ScrollPrint("onReceive",2,TimeStamp=True)
    Window4.ScrollPrint(" ",2)
    Window4.ScrollPrint("==Packet RECEIVED=================================================",2)

    Decoded  = packet.get('decoded')
    Message  = Decoded.get('text')
    To       = packet.get('to')
    From     = packet.get('from')

    #Even better method, use this recursively to decode all the packets of packets
    DecodePacket('MainPacket',packet,Filler='',FillerChar='',PrintSleep=PrintSleep)

    if(Message):
      Window3.ScrollPrint("From: {} - {}".format(From,Message),2,TimeStamp=True)
    Window4.ScrollPrint("=================================================================",2)
    Window4.ScrollPrint(" ",2)
Similar functions are used to detect if a connection was lost, or if the node is updated.
def onConnectionLost(interface, topic=pub.AUTO_TOPIC): # called when we (re)connect to the radio
    Window2.ScrollPrint('onConnectionLost',2,TimeStamp=True)
    UpdateStatusWindow(NewDeviceStatus = "DISCONNECTED",Color=1)


def onNodeUpdated(interface, topic=pub.AUTO_TOPIC): # called when we (re)connect to the radio
    Window2.ScrollPrint('onNodeUpdated',2,TimeStamp=True)
    Window1.WindowPrint(1,4,'UPDATE RECEIVED',1,TimeStamp=True)
    Window4.ScrollPrint("",2)
Keyboard Input
Curses does more than draw text windows. It also handles keyboard input. The following function demonstrates how curses will poll the keyboard for a key, determine what key was pressed, then call a specified function.
def PollKeyboard():
  global stdscr
  global Window2
  global interface

  #Window2.ScrollPrint("PollKeyboard",2,TimeStamp=True)
  ReturnChar = ""
  c = ""
  #curses.filter()
  curses.noecho()

  try:
    c = chr(stdscr.getch())
  except Exception as ErrorMessage:
    c=""


  #Look for digits (ascii 48-57 == digits 0-9)
  if (c >= '0' and c <= '9'):
    #print ("Digit detected")
    #StatusWindow.ScrollPrint("Digit Detected",2)
    ReturnChar = (c)

  if (c != ""):
    #print ("----------------")
    #print ("Key Pressed: ",Key)
    #print ("----------------")
    OutputLine = "Key Pressed: " + c
    #Window2.ScrollPrint(OutputLine,4)
    ProcessKeypress(c)
  return ReturnChar


def ProcessKeypress(Key):
  global stdscr
  global StatusWindow
  global Window2
  global Window4
  global interface
  global PauseOutput
  global PrintSleep
  global OldPrintSleep
  count  = 0

  OutputLine = "KEYPRESS: [" + str(Key) + "]"
  Window2.ScrollPrint (OutputLine,5)
  # c = clear screen
  # i = get node info
  # n = show all nodes in mesh
  # p = pause
  # q = quit
  # r = reboot
  # s = Send message


  if (Key == "p" or Key == " "):
    PauseOutput = not (PauseOutput)
    if (PauseOutput == True):
      Window2.ScrollPrint("Pausing output",2)
      StatusWindow.WindowPrint(0,0,"** Output SLOW - press SPACE again to cancel **",1)
      PrintSleep = PrintSleep * 3

    else:
      Window2.ScrollPrint("Resuming output",2)
      StatusWindow.WindowPrint(0,0," ",3)
      PrintSleep = OldPrintSleep
      #StatusWindow.ScrollPrint("",2)

  #elif (Key == "i"):
  #  IPAddress = ShowIPAddress()
  #  ar.ShowScrollingBanner2(IPAddress,0,225,0,3,0.03)


  elif (Key == "i"):
    Window4.Clear()
    GetMyNodeInfo(interface)

  elif (Key == "n"):
    Pad1.Clear()
    DisplayNodes(interface)

  elif (Key == "q"):
    FinalCleanup(stdscr)
    exit()

  elif (Key == "c"):
    ClearAllWindows()

  elif (Key == "r"):
    Window2.ScrollPrint('** REBOOTING **',1)

    FinalCleanup(stdscr)
    os.execl(sys.executable, sys.executable, *sys.argv)

  elif (Key == "s"):
    SendMessagePacket(interface)
Sending a message
You can send a message by pressing the S key. When you do this, the SendMessagePacket() function is called. A curses text window is activated which allows you to type your message. When you are finished you press CTL-G. Enter will simply add newlines which are auto-stripped.
def SendMessagePacket(interface, Message=''):
    Window2.ScrollPrint("SendMessagePacket",2)
    TheMessage=''


    InputMessageWindow.TextWindow.move(0,0)
    #Change color temporarily
    SendMessageWindow.TextWindow.attron(curses.color_pair(2))
    SendMessageWindow.TextWindow.border()
    SendMessageWindow.TitleColor = 2
    SendMessageWindow.Title = 'Press CTL-G to send'
    SendMessageWindow.DisplayTitle()

    SendMessageWindow.TextWindow.attroff(curses.color_pair(2))

    SendMessageWindow.TextWindow.refresh()

    #Show cursor

    curses.curs_set(True)
    # Let the user edit until Ctrl-G is struck.

    InputMessageWindow.TextWindow.erase()
    InputMessageBox.edit()
    curses.curs_set(False)


    # Get resulting contents

    TheMessage = InputMessageBox.gather().replace("\n", " ")

    #remove last character which seems to be interfering with line printing
    TheMessage = TheMessage[0:-1]

    #Send the message to the device
    interface.sendText(TheMessage)


    Window4.ScrollPrint(" ",2)
    Window4.ScrollPrint("==Packet SENT===========================================",3)
    Window4.ScrollPrint("To:      All:",3)
    Window4.ScrollPrint("From:    BaseStation",3)
    Window4.ScrollPrint("Message: {}".format(TheMessage),3)
    Window4.ScrollPrint("========================================================",3)
    Window4.ScrollPrint(" ",2)

    SendMessageWindow.Clear()
    SendMessageWindow.TitleColor = 2
    SendMessageWindow.Title = 'Press S to send a message'
    SendMessageWindow.DisplayTitle()

        Window3.ScrollPrint("To: All - {}".format(TheMessage),2,TimeStamp=True)
Get Node Info
The node in this case is the Meshtastic device connected to the Raspberry Pi via USB cable. A quick function call is all that is required to get some cool information.
def GetMyNodeInfo(interface):

    Window4.ScrollPrint(" ",2)
    Window4.ScrollPrint("==MyNodeInfo===================================",3)
    TheNode = interface.getMyNodeInfo()
    DecodePacket('MYNODE',TheNode,'','',PrintSleep =PrintSleep)
    Window4.ScrollPrint("===============================================",3)
    Window4.ScrollPrint(" ",2)

Get info for all nodes
Getting info for all nodes requires a bit of looping. This time instead of decoding a packet using a brute force recursion, I decided to look for specific key/value pairs. By now I have a much better understanding of how Meshtastic organizes the data so it was pretty straightforward to determine the right commands to use.
def DisplayNodes(interface):
Pad1.Clear()
Pad1.PadPrint("--NODES IN MESH------------",3)
try:
# interface.nodes.values() will return a dictionary
for node in (interface.nodes.values()):
Pad1.PadPrint("NAME: {}".format(node['user']['longName']),3)
Pad1.PadPrint("NODE: {}".format(node['num']),3)
Pad1.PadPrint("ID: {}".format(node['user']['id']),3)
Pad1.PadPrint("MAC: {}".format(node['user']['macaddr']),3)
if 'position' in node.keys():
#used to calculate XY for tile servers
if 'latitude' in node['position']:
Lat = node['position']['latitude']
Lon = node['position']['longitude']
xtile,ytile = deg2num(Lat,Lon,10)
Pad1.PadPrint("Tile: {}/{}".format(xtile,ytile),3)
Pad1.PadPrint("LAT: {}".format(node['position']['latitude']),3)
if 'longitude' in node['position']:
Pad1.PadPrint("LONG: {}".format(node['position']['longitude']),3)
if 'batteryLevel' in node['position']:
Pad1.PadPrint("Battery Level found",3)
Battery = node['position']['batteryLevel']
Pad1.PadPrint("Battery: {}".format(Battery),3)
if 'lastHeard' in node.keys():
LastHeardDatetime = time.strftime('%Y-%m-%d %H:%M:%S', time.localtime(node['lastHeard']))
Pad1.PadPrint("LastHeard: {}".format(LastHeardDatetime),3)
time.sleep(PrintSleep)
Pad1.PadPrint("",3)
except Exception as ErrorMessage:
TraceMessage = traceback.format_exc()
AdditionalInfo = "Processing node info"
ErrorHandler(ErrorMessage,TraceMessage,AdditionalInfo)
Pad1.PadPrint("---------------------------",3)
~~~

## Main Function
Curses requires you to wrap your main section in a function, and call that after initializing curses.
#--------------------------------------
Main (pre-amble --
#--------------------------------------
#if SIGINT or CTL-C detected, run SIGINT_handler to exit gracefully signal(SIGINT, SIGINT_handler)
#only execute if we are in main if name=='main': try:
  # Initialize curses
  stdscr=curses.initscr()
  # Turn off echoing of keys, and enter cbreak mode,
  # where no buffering is performed on keyboard input
  curses.noecho()
  curses.cbreak()
  curses.curs_set(0)

  # In keypad mode, escape sequences for special keys
  # (like the cursor keys) will be interpreted and
  # a special value like curses.KEY_LEFT will be returned
  stdscr.keypad(1)

  main(stdscr)                    # Enter the main loop

  # Set everything back to normal
  FinalCleanup(stdscr)
except Exception as ErrorMessage:
  # In event of error, restore terminal to sane state.
  TraceMessage = traceback.format_exc()
  AdditionalInfo = "Main pre-amble"
  ErrorHandler(ErrorMessage,TraceMessage,AdditionalInfo)
The main code is pretty standard fare. Open some windows, connect to the device, set up some listeners.
CreateTextWindows()

interface = meshtastic.SerialInterface()

#Get node info for connected device
Window4.ScrollPrint("Requesting device info",2)
GetMyNodeInfo(interface)

#subscribe to connection and receive channels
pub.subscribe(onConnectionEstablished, "meshtastic.connection.established")
pub.subscribe(onConnectionLost,        "meshtastic.connection.lost")
pub.subscribe(onNodeUpdated,           "meshtastic.node.updated")

#Check for message to be sent (command line option)
if(SendMessage):
   interface.sendText(TheMessage)

   #Go into listening mode
Window4.ScrollPrint("Listening for: {} seconds".format(TimeToSleep),2)
Window4.ScrollPrint("Subscribing to interface channels...",2)
pub.subscribe(onReceive, "meshtastic.receive")


while (1==1):
  GoToSleep(5)

interface.close()
Window4.ScrollPrint("--End of Line------------",2)
Window4.ScrollPrint("",2)
```
Thank for following along with me on this adventure. And big thanks to HashNode for inspiring me to get back to writing.